Wednesday 18 August 2010

Bladerunner compositional animation


My aim for this project is to use my 3d model i created of the spinner, texture it and animate it. Then finally composite it in an original scene from the film. Trying to create as much realism as possible, as well as keeping a single still frame alive through out an animation. I have made a quick attempt at syncing the 3d model within a frame from the film below using photoshop.

Original Frame

Frame after i added my 3D model and tweaked the image


This is a quick attempt but i have just added lens flares to the spinner. I have also added flares to the lights on the right hand side, just to bring them back to life and refresh them. i have darkened the actual spinner and blurred some of the sharp edges.

A few ideas I am going to bare in mind to add to the sequence would be to add atmosphere through gradual mist, flickering lights, an animated coca cola logo, more light glares possible blurring of the background and use of shadow as well as reflection caused by the spinners presence. In particular the spread of light caused by its placement in the scene. I will look into using 3d layers in after effects to try and achieve the effect that the moving light will have on the buildings in the scene.


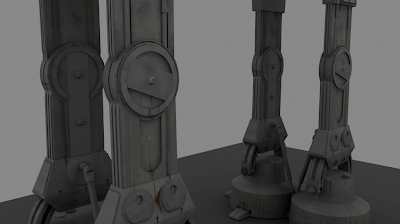
Adding textures to the model

Another render from the same angle but with the spinner facing a different angle, in this shot I have added the lights as well as the lights blur as it dispenses into the sky. I have also used a hdri image to add reflections to the spinners shiny surface, in particular the windscreen. The image maybe to small to see this, il try and add more detail to show this.


Close up


Still needs quite a bit of work and research to try and get it to integrate with the image better i think. The next steps are to add more blur and light to the underside of the vehicle, just so there is some sign that light exists there a little hint should do.

Monday 16 August 2010

AT-AT texturing and compositing


I have been modeling an AT-AT from the Star Wars films, and i decided to texture it and render the final 3d model and composite the render into a background. The aim was to try and achieve as much realism as possible. You can see the final image above. I kept a log of the different segments that i had textured and iv decided to log them in this blog for people to see the process that was involved in producing the image above.


Early models of the AT-AT before texturing.


I started from the foot upwards, from research i noticed the At-At models seen in the film were very dirty and oily looking. So i decided my at-at would look quite run down and dirty.


To texture the base of the foot a took the Uv's from Maya and imported them into photoshop. I also added a bump map to the foot to provide extra detail.

The foot


I added more dirt to the underside of the ankle section in the 2nd picture, as this is where i thought the dirt would gather on a real at -at.

I then began to create the texture for the arch section joining the ankle with the foot.


Added rust to the ankle section


Upper leg section


Some more detail, i added a bump map to the inner circle section of the upper leg to show possible wear caused by the spinning element resting above.


Leg without texture


Leg with texture


Upper body textures


Head before texture


At-At fully textured ready for compositing in photoshop


To achieve the image above, I re-painted over a still I found from the film for the base of the background. Then using the different options in photoshop I altered the colour and look of the 3d AT-AT so it fitted better in the scene. I also blurred the feet quite a bit and added snowy winds to the areas around the feet. This helped a lot bedding the 3d model into the painted background. Adding a very pale white wind and mist to the body of the at-at and its surroundings also helped it sit in the scene.

I hope you like the final result