


I have found loads of reference images that I will study and use as reference when modeling the car. I will model each panel of the car seperatly, eg. the bonet, the roof, the doors, boot etc. I will start with the bonnet. I have found an imported the image planes which I will model from.

I will start from the front of the car and work my way to the rear, im going to sketch out the basic mesh for each panel and then revisit each panel to add more detail. Aslong as I keep the edges of each panel consistant and lined up with the previous panel it should work out nicely.


The basic mesh of the bonnet has been created so I will move onto the side wheel arch.


Ok the arch panel will still need quite a bit of work but the basic shape I am hapy with. By extruding the edges closest to the door panel from the arch panel I can create the basic shape for the door. This will keep the panels lined up nicely.

 I have then extruded from the door edge to create the beginnings of the rear panel, which is quite a big one which runs along the roof edges to create the outline for the doors windows.

Its getting there, I will work on the boot and lower bumper section next.


The basic panel mesh of the car is pretty much in place now. Next on the list are the spoiler and the glass sections of the car, windscreen etc.


The glass sections are in place but will need some tweaking later to ensure they are lined up perfectly. Ok now that the main pieces are in place I will assign a car shader to the car panels so as I move about the viewport I can keep a track on how the shine from the viewports 'light' is being picked up. The key I find to a good car model render is how the reflections are picked up by each panel. As each panel is a seperate object but act as one 'car body' object the panels need to reflect consistently and equally.


I forgot to demonstrate how I modelled the front bumbper so il quickly go over this 'panel'. This section was the most challenging piece so far to create, due to all the curved and straight shapes.


Some of the topology still needs tweaking but as you can see the shape is there.
I am now working on the more 'detailled' sections that could be forgotton about. In particular the rubber lining that lines the connecting panels around the windscreen and the windows on the doors. Even tho these parts might not be greatly visible in a final render, I feel it would be noticeable if it wasnt there.


The small rear window does have a thicker black edging, but this will be done through textures at a later stage. You can see this in the below reference image


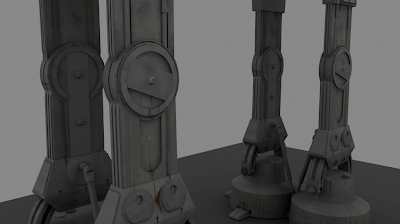
I have modeled the windscreen wipers and mirrored the panels I am happy with. I am going to concentrate on the grill section near the front bumper. Model the wheel and its alloy and model some of the interior that will be seen from the camera angle I choose to render from. So I will also start to think about the composition of the final render. I have started sketching out the roll cage and I will continue to define it. As you can see from the renders so far its getting there and starting to take shape.
# Quick note about the shader, it appears very flakey in the renders, and this shader will be edited quite a lot later. It is being used purely for its reflective properties as a point of reference at the moment.
I have started work on the wheel, I have also added a light to my scene with shadows turned on so I can start to get a more realistic output when I render/ preview the model. This helps as I have started adding different shaders to the car and I can now see more realistic results. The model still needs work, and this can be seen in the renders below but its getting there. Its definitely looking like a Subaru Impreza...which is good!


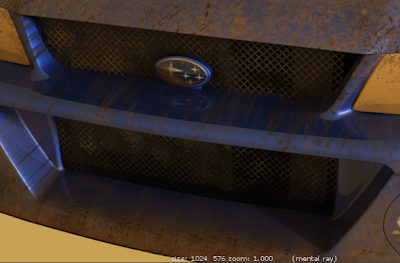
I have been adding some detail to the underside of the chassis. As well as adding some detail to the grill placed within the front bumper. As I will place the car in a dramatic pose the under side may be visible. I have also edited the bonnet and added the air intake holes to the bonnet scoop.


I have added a few mud flaps and door handles. The mud flaps will be fun to play with later when it comes to texturing, making them really muddy and dirty.


I have added a texture to the badge, This may be edited again if need be, but for now I am happy with it. I have used a simple blinn as the shaders base. I may create a layered texture and incorporate a glossy coat. So the badge looks more realistic keeping its design but with a glossy, reflective outer.


Quick edit to this section, I have checked with detailed reference images and the badge sits on a tiny stand with an outer casing which is also the same colour as the car paint. I have attached a render and the refrence image to show this below.


I have modeled a helmet, to show people in the car, I will add more to the presence of a person if nessasary later.

Ok the car is looking there at the moment, Im pretty happy with the actual shape and look of the car so far. I will start to looking into texturing the different sections of the car. Having fun with making it look muddy and dirty as if its just being skidding around a tight hair pin and splashed though muddy puddles, scattered around a rally track.

Car in a raised position ( done to check out how the car could look in a more dramatic pose)

I started with the bumper, adding the STI decals and some dried dirt and dust. I am still undecided whether to texture the car with the yellow rally car subaru swooshes. I will texture the dirt first and if I decide to add the other decals later I can add them as a shader below the dirt shader within a layered shader.

I have added an hdri image to give myself some more realistic feedback when rendering. I have added dirt and mud splashes to the bonnet and the headlights.

Here I have added dirt to the orange side lights as well as adding some dusty dirt to the grill. Its hard to make out in this render ill add one later to show this more.


I have tried to add continuous dirt to the pins. The dirt that has splashed on the bonnet would also go over the pins, so I have tried to texture the pins with that in mind.


Ok here I have started to add dirt to the side door and the tyre tread on the wheels. I have also added built up and dried dirt to the mud flaps as they would capture quite a lot of the kicked up dirt from the wheels.

I have got rid of the hdri image for this render to get a better idea of were the dirt is hitting. I am pleased with the progress so far. In this render you can also pick up the collected dirt in the grill.

Added a bit more dirt around the headlight
I have also added a texture to the wing mirror as well as adding the subaru rally decals to the bonnet to see how they look. I think I will try and add the rally decals to the rest of the car. As they are quite iconic with this particular subaru model. I am having trouble sourcing hi res versions of the decals so I may have to make them myself.


I have added a texture to the spoiler
Reference image showing relevant decals

Side Decal


I have added the subaru 'swooshes' and the Pirelli decals to the bumper and the side door and rear panel.
Ok I think my car is now on its last lap!........ great! Im going to pick a pose and camera angle to render from, making sure that the camera angle and the position of the car looks dramatic. The cars position needs to express motion, any adjusting I do now will help later down the line when I import my render into photoshop. I have experimented with different camera angles and positions. I would like the car to be on the floor so I can add mud splashes. The result of the cars speed and impact.


I am going to work with the camera angle and the cars position above. I feel it shows motion and built up energy. I like the lighting so far but I will tweak it slightly.
I have tweaked the headlights by adding textures and playing with the shaders attributes. I have also added some roll cage detail to the cars structure.

I imported my final render into photoshop along with an ambient occlusion pass.

I started painting and adding a soil, dirty and muddy floor to the scene. Which would allow the car to kick up both dust and muddy splashes.

I then started to focus on adding detail and depth.

This process took a few hours but was enjoyable, trying to get the car to fit into a new environment. I was looking at chiaroscuro a lot during this process, framing the render with black and using the light of the headlights as the focal point to the scene. The mist helped to add drama and atmosphere.


Below is the final Render, I am very happy with it, as I have achieved everything I set out to do. I am pleased I managed to keep the realism in the final image. As I was concerned, when I digitally painted the background I would loose some realism, but if any thing it has helped the render achieve the atmosphere and drama that I originally set out to achieve. I hope you have enjoyed this blog and like the final result!


